NEWS – New Hordes Gargantuans…

As expected by most, Hordes got their second wave of Gargantuans just like Warmachine had their second wave of Colossals. All of the new sculpts/sketches look amazing. I personally think it’s really cool that they are mostly all new model types with the Glacier King being closest to it’s older original brother. Also take note of the 10 year anniversary of Hordes teasers at the end. Check out the video below!

Minions Swamp Horror Heavy Warbeast…

So the second I heard about this model awhile ago I instantly thought it would be a great model to try out water effects. I finally put him on the painting table because of Rask. The thought of him with FURY would make anybody giddy. The problem of course was doing a simple conversion to make it water effects ready without having to go through the hassle of sculpting. I made this very simple TUTORIAL on how to do that. It took me several days to finish the water effects since each layer requires about 24 hours to dry and you can only layer it about 1/8″ deep at a time. Besides that I saved a lot of time on painting since it’s only a portion of the original model. Since the water dries clear you also have to paint the base itself or base it with other elements if desired. I decided to paint a mix of colors using browns and greens for that dirty Bayou look. For being my first model using water effects I am pretty happy with the results!

giant-octopus-octopus-pets-holly9000-demotivational-poster-1260237939I disagree!!!

minions_swamp_horror01He will slap you three times then kiss you. It’s ABUSIVE but he loves you, really.

  1. White P3 Primer
  2. Base coat colors using Vallejo Game Colors
  3. Used Citadel Badab Black wash all over the miniature
  4. Minimal highlights (membrane, eyes, & teeth)
  5. Base is comprised of water effects (2-3 layers), Army Painter Battlefield Swamp Tufts, & Flame Mix Leaves
  6. I varnish with Rust-oleum Painter’s Touch Gloss Coat (Non-Yellowing & UV Resistant) & then use Testor’s Dullcote to take away the gloss
  7. Vallejo Gloss Varnish on his lower body parts, mouth, teeth, eyes, & water to give that wet/moist feel

TUTORIAL – Hordes Minions Swamp Horror conversion…

So I’m sure most of you out there will agree that the Swamp Horror art in the Hordes Domination book got you excited. Then the model came out and a “Awww man?!” could be collectively heard around the globe. I know there are several other tutorials out there on the interwebs that show you how to cut this octopus up and make it look like it’s rising out of the swamps, but they all involve too much green stuff/epoxy/modeling for my taste. I knew there had to be a easier way?! So here’s my super easy/lazy way of converting your Swamp Horror without any green stuff whatsoever!

TOOLS NEEDED

  • Hobby Pliers/Cutters (I recently bought a Xuron 410 which are pretty amazing!)
  • Razor Saw (You can find them for around $6USD-$7USD)
  • X-acto Knife
  • A file of some kind
  • Pin vice & some brass rod (Any size except super thin)
  • Superglue
  • A hollow base if water effects are desired for later (Secret Weapons Bases or DIY)

swamphorrortutorial01
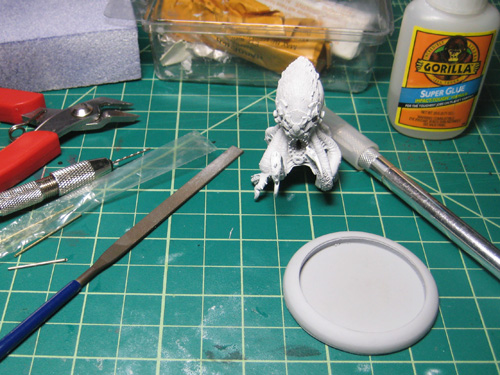
Get all your tools ready, we’re going to be ripping things apart!

swamphorrortutorial02
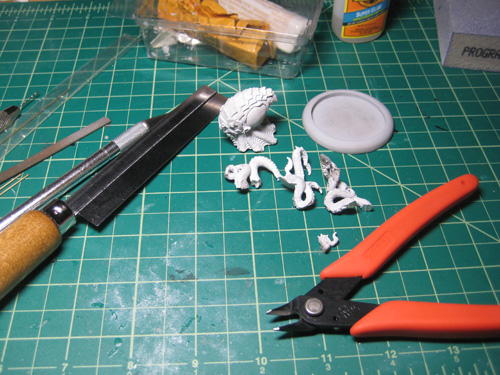
Use your Razor Saw to cut the main body as you desire.

swamphorrortutorial03
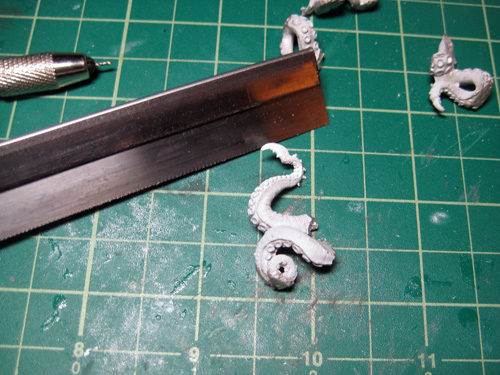
Use your Razor Saw & Pliers to cut up the tentacles so you ultimately will have 3 separate ones. File and smooth down the bottom of all your pieces so it can sit on the base properly.

swamphorrortutorial04Dry fit all the pieces to make sure they sit flat and how you want to arrange them.

swamphorrortutorial06
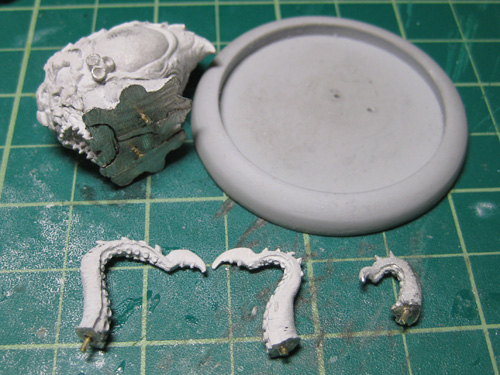
Use your Pin Vise and brass rods to superglue all the brass rods to the pieces. Figure out a arrangement you like and mark it by scratching the surface of the base with the brass rods on your pieces. Pin vice holes into your base for final placement. I also physically bent some of the tentacles so they were more dynamic. Glue everything down when you’re ready!

swamphorrortutorial07
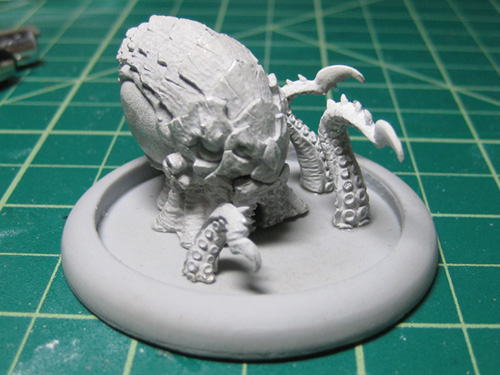
And now your all done! Wasn’t that easy?! This conversion also helps remind you that it has 1 bite & 3 tentacle attacks 🙂

Minions Boneswarm…

I only finished 1 more model for month 5 & 6 of my Journeyman League since I took a vacation for a couple weeks. I wasn’t able to finish painting my other casters and solos in time. Alas the Boneswarm…

Winner Winner Chicken Bone Dinner!

Journeyman League – Month 2 – 15 points…

Month 2 is done and I decided to paint some extra models to give me some options while battling it out. For most of the games I have been using the Bull Snapper since Spiny Growth is super awesome 🙂

Journeyman League Month 2 Hobby Points: 6
Total Journeyman League Hobby Points: 14

Minions Bull Snapper Light Warbeast…

Oh the variations of alligators and crocodiles. I decided to go back to fully painting the underside tan on the Bull Snapper because it breaks up the colors nicely. Now I have to paint another Blackhide Wrastler with this technique. QUICK! Spiny Growth EVERYTHING!!!

Before & after blackwash

Everytime I look at this model I imagine it singing opera…I have no idea why

  1. White P3 Primer
  2. Base coat colors using Vallejo Game Colors
  3. Used Citadel Badab Black wash all over the miniature
  4. Minimal highlights (tongue, eyes, & teeth)
  5. Bases are comprised of a mix of Gale Force Nine medium & fine basing grit with Army Painter Battlefield Swamp Tuft
  6. Rust-Oleum Clear Gloss then Army Painter Anti-Shine Matte Varnish all over the model
  7. Vallejo Gloss Varnish only on his mouth, tongue , & teeth to give that wet/moist feel

Journeyman League – Month 1 – 11 points…

My Journeyman League Warpack is doneskiessssss! Blindwater Congregation Minions Pact in full effect SON! I’ve been getting in some casual games with them and I still have quite a lot of learning to do with them strategy-wise. Battle Reports will be posted soon when I get some official league battles in after this weekend.

My Warpack 🙂

Journeyman League Month 1 Hobby Points: 8

Minions Blackhide Wrastler Heavy Warbeast…

My first green machine! So before I chose what green to go with I had to think of a secondary green to use since I would most likely have 2 Blackhide Wrastlers as well as 2 Gatormen Posses. So with that in mind I chose a darker green for this Wrastler. I also decide that Purple would be a nice color to compliment the green fairly well a la color chart. I just got color theory all up in yo face! The one issue I didn’t decide on yet when I painted this was whether or not to have the underside tan go all the way up to his lower jaw. After painting the model I think I am going to try that on my other Wrastler 🙂

Basecoat once again…

Lazy Blackwash technique is holding up so far…

  1. White P3 Primer
  2. Base coat colors using Vallejo Game Colors (Underbelly: Bronze Fleshtone, Skin: Goblin Green, Spiny Parts: Cayman Green)
  3. Used Citadel Badab Black wash all over the miniature
  4. Minimal highlights (tongue, eyes, & teeth)
  5. Bases are comprised of a mix of Gale Force Nine medium & fine basing grit with Army Painter Battlefield Swamp Tuft
  6. Army Painter Anti-Shine Matte Varnish
  7. Vallejo Gloss Varnish only on his mouth, tongue , & teeth to give that wet/moist feel

Minions Ironback Spitter Heavy Warbeast…

Soooooo I can’t even recall the last time I painted a fully organic/animal model. I was always more of a sci-fi buff versus fantasy. This would also be my very first model for my Blindwater Congregation Army at our local Journeyman league. No Pressure. I decided to go with a very very limited palette since it is a beast and you usually don’t see a wide array colors in the animal kingdom except for some birds, fishes, amphibians, reptiles, mammals, ok ok I was just lazy and wanted to keep it simple! The Ironback Spitter wasn’t too hard to put together and the arms were pretty open to pose how you wanted to some degree. To break away from all the future green my Blindwater Congregation would be consumed in, I decided to go brown Desert Tortoise style. Let the lazy blackwash technique on organic models experiment begin!

Basecoat

“Ahhhhhhhh WTF Man!? I got a pink tongue not RED!!!”

The Lazy Blackwash Technique Works! Me thinks…

  1. White P3 Primer
  2. Base coat colors using Vallejo Game Colors
  3. Used Citadel Badab Black wash all over the miniature
  4. Minimal highlights (tongue & eyes)
  5. Bases are comprised of a mix of Gale Force Nine medium & fine basing grit with Army Painter Battlefield Swamp Tuft
  6. Army Painter Anti-Shine Matte Varnish
  7. Vallejo Gloss Varnish only on his mouth & tongue to give that wet/moist feel